
Edit a Link Name
- Dashboard > Appearance > Menus
- Under Menu Structure select the item to edit by clicking the down arrow on the right.

- Edit the text under the Navigation Label field
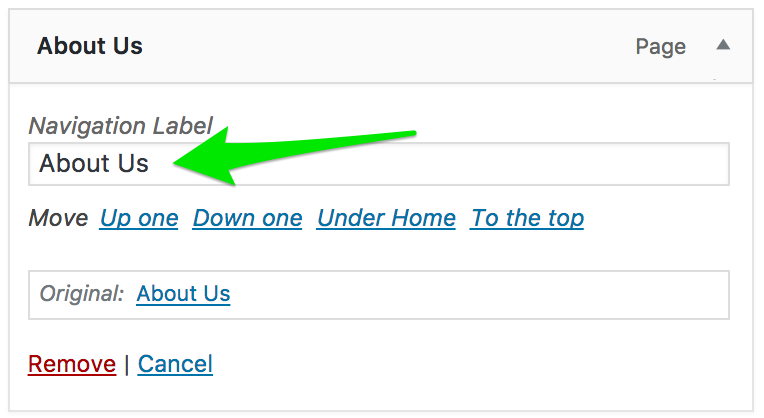
- Click the Save Menu button
Note:
Best practices say link names should match the top headline of the destination page. Go to the Edit Top Headline on Page instructions to assure they are the same.
×
Best practices say link names should match the top headline of the destination page. Go to the Edit Top Headline on Page instructions to assure they are the same.
Edit a Custom Link Address
- Dashboard > Appearance > Menus
- Under Menu Structure select the item to edit by clicking the down arrow on the right.

- Edit the text under the URL field
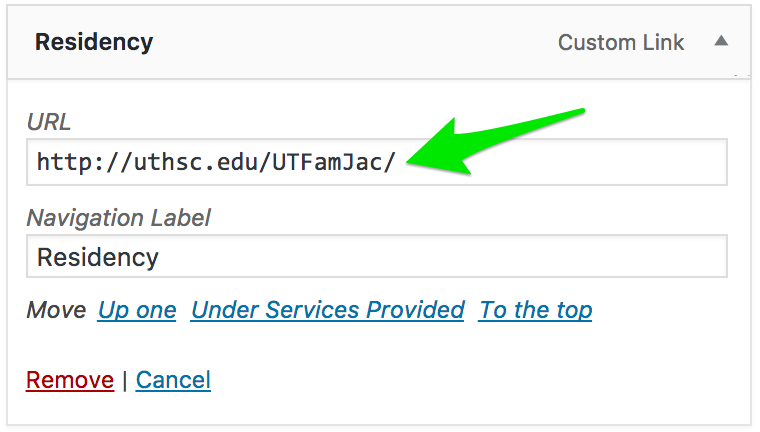
- Click the Save Menu button
Add an external link
- Dashboard > Appearance > Menus
- Click Custom Links.

- Fill in text fields for URL and Link Text then click the Add to Menu button
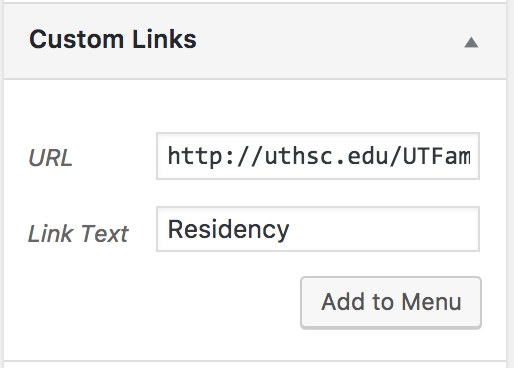
- The new link will be added to the last position.

- Click the Save Menu button
Add Link to Recently Created Page
- Dashboard > Appearance > Menus
- Under Pages > Most Recent select the select the page you want added then click the Add to Menu button.
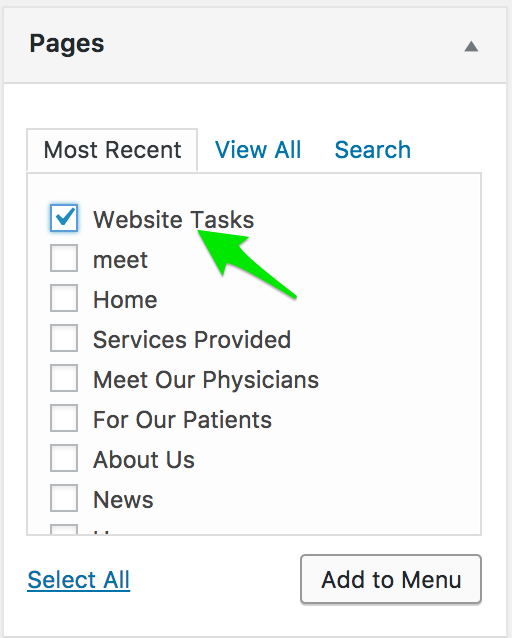
- The new link will be added to the last position.
- Click the Save Menu button
Delete A Link
- Dashboard > Appearance > Menus
- Under Menu Structure select the item to edit by clicking the down arrow on the right.
- Click Remove
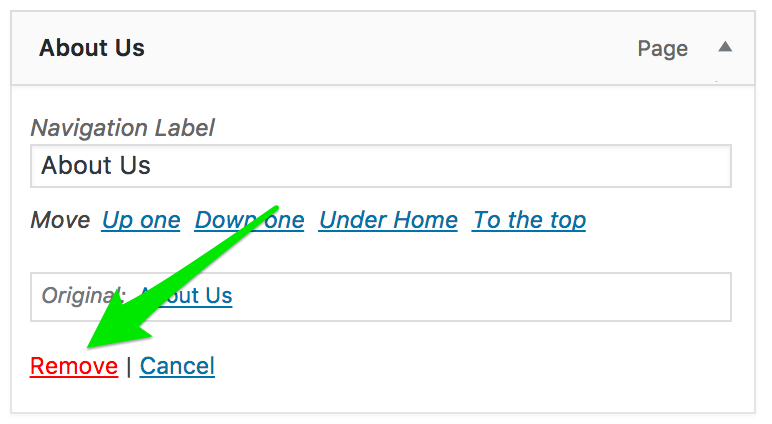
- Click the Save Menu button
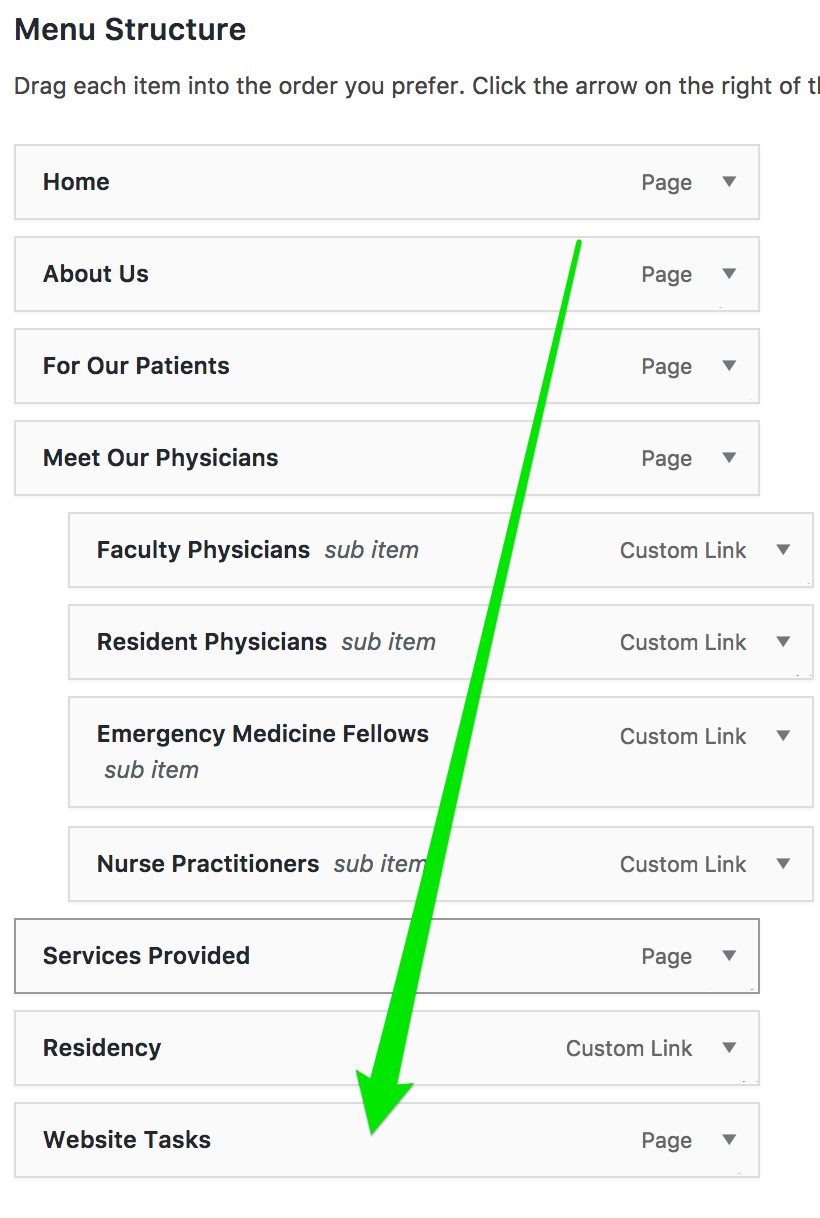
Move a Link Position
- Dashboard > Appearance > Menus
- Under Menu Structure click and hold the item.
- Move the item to the desired location and release mouse click
- Click the Save Menu button
Update a Physician or Resident Physician's Photo
- Go to Physicians or Resident Physicians.
- Click the Edit this Post button under the item you would like to update.
- Click the photo in the Featured Image widget.
- Click the Upload Files tab.
- Drag and drop a 200 x 200 pixel image into the browser window.
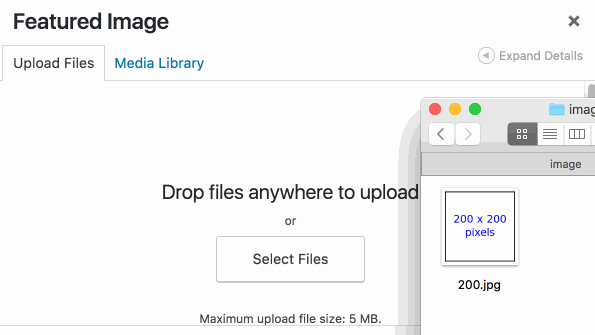
- The new image that was loaded will be selected for you. Add text to the field next to Alt Text.
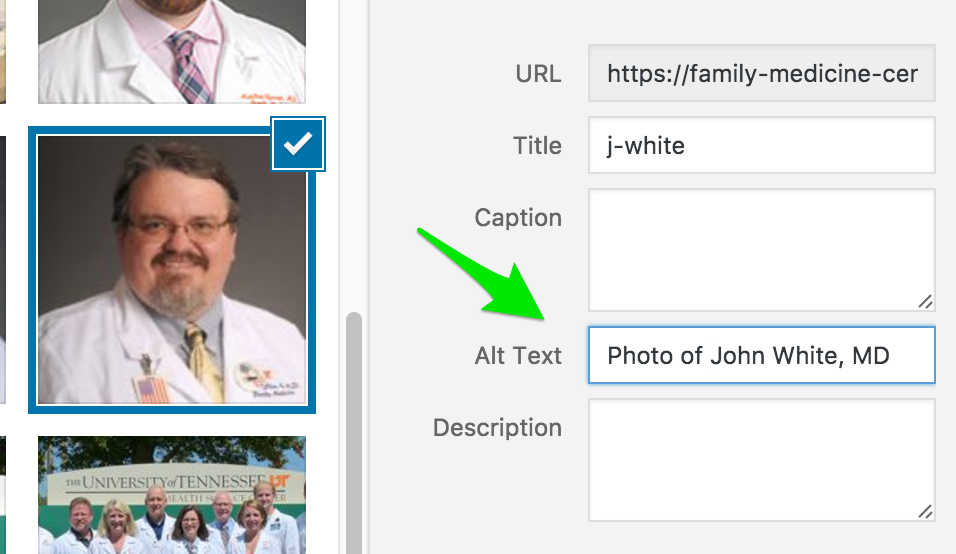
- Click the Set featured image button.
Update a Physician or Resident Physician's Info
- Go to Physicians or Resident Physicians.
- Click the Edit this Post button under the item you would like to update.
- Edit field and click Update. Note:
There are 14 fields that you can edit for Physicians and only one for Resident Physicians that display content on the webpage. Each group has one field titled Last Name, First Name. This one controls the sorting order.
Add a Physician or Resident Physician
- Go to Physicians or Resident Physicians.
- Click the Add New button.
- Fill out the form.
Note:
There are 14 fields that you can edit for Physicians and only one for Resident Physicians that display content on the webpage. Each group has one field titled Last Name, First Name. This one controls the sorting order. - Click Set featured image in the Featured Image widget.
- Drag and drop a 200 x 200 pixel image into the browser window.
- The new image that was loaded will be selected for you. Add text to the field next to Alt Text that describes the image.
- Click the Set featured image button.
- Click the Publish button.
Delete a Physician or a Resident Physician
- Go to Physicians or Resident Physicians.
- Mouse over the item you want to delete and click Trash.
Header (Logo & Slogan)
To update this section please send an email with any changes to Web Services.
×Slider - Edit Text
- Go to Pages in the left menu.
- Click Home - Front Page
- Under the Homepage Slider widget edit the caption text of the image.
Note:
You may need to click the Homepage Slider widget bar to expand it.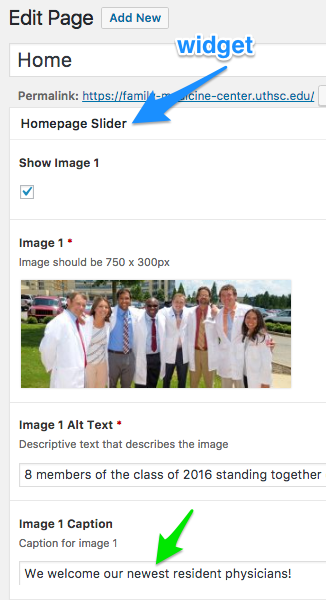
- Click the Update button.
Slider - Add Text
- Go to Pages in the left menu.
- Click Home - Front Page
- Under the Homepage Slider widget add text to the caption field of the image.
Note:
You may need to click the Homepage Slider widget bar to expand it it.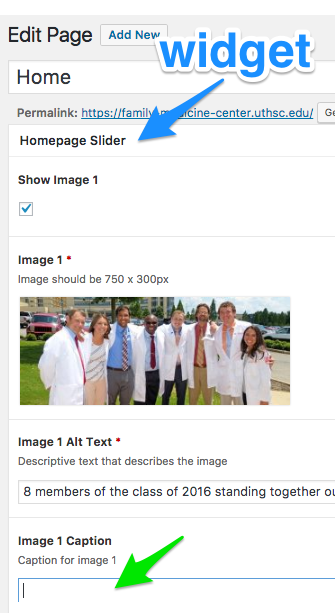
- Click the Update button.
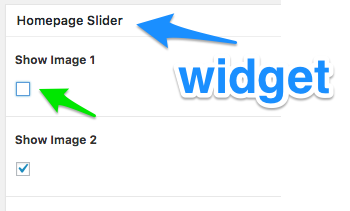
Slider - Delete a Photo
Note:
The slider may display 1 to 4 images. Existing images in the Homepage Slider widget can either be displayed or hidden.
The slider may display 1 to 4 images. Existing images in the Homepage Slider widget can either be displayed or hidden.
- Go to Pages in the left menu.
- Click Home - Front Page
- Under the Homepage Slider widget click the checkbox of the image to uncheck it. This will hide the image from the rotation.
Note:
You may need to click the Homepage Slider widget bar to expand it.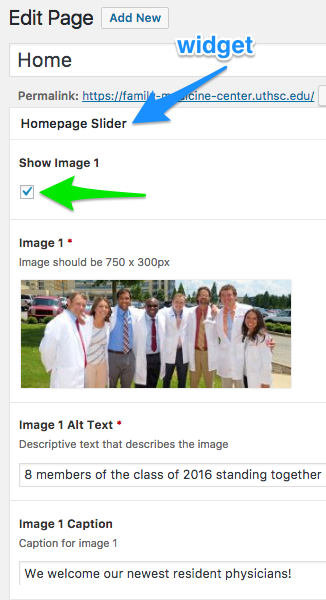
- Click the Update button.
Slider - Add a Photo
Note:
The slider may display 1 to 4 images. Existing images in the Homepage Slider widget can either be displayed or hidden. To add a new image, simply replace an existing one.
The slider may display 1 to 4 images. Existing images in the Homepage Slider widget can either be displayed or hidden. To add a new image, simply replace an existing one.
- Go to Pages in the left menu.
- Click Home - Front Page
- Under the Homepage Slider widget make sure the checkbox of the image is checked it. Unchecked images will be hidden from the rotation.
- Click the Add Image button that appears.
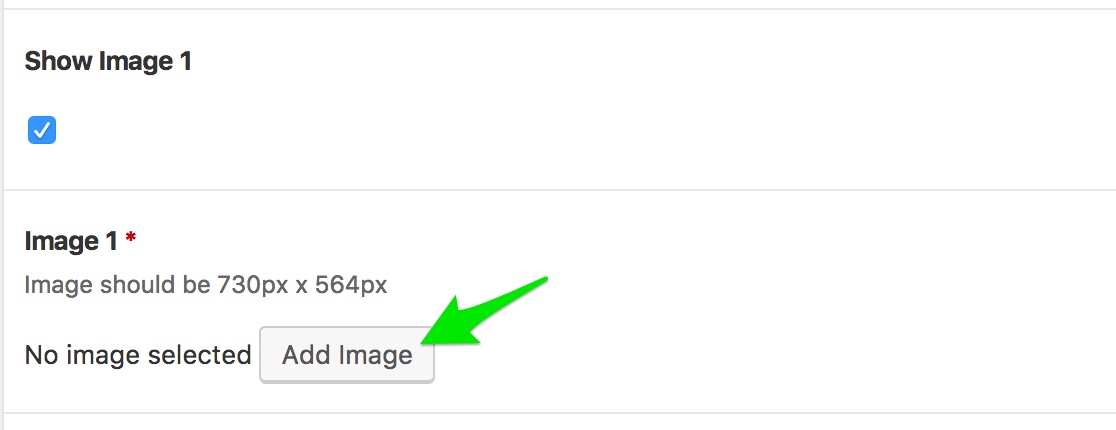
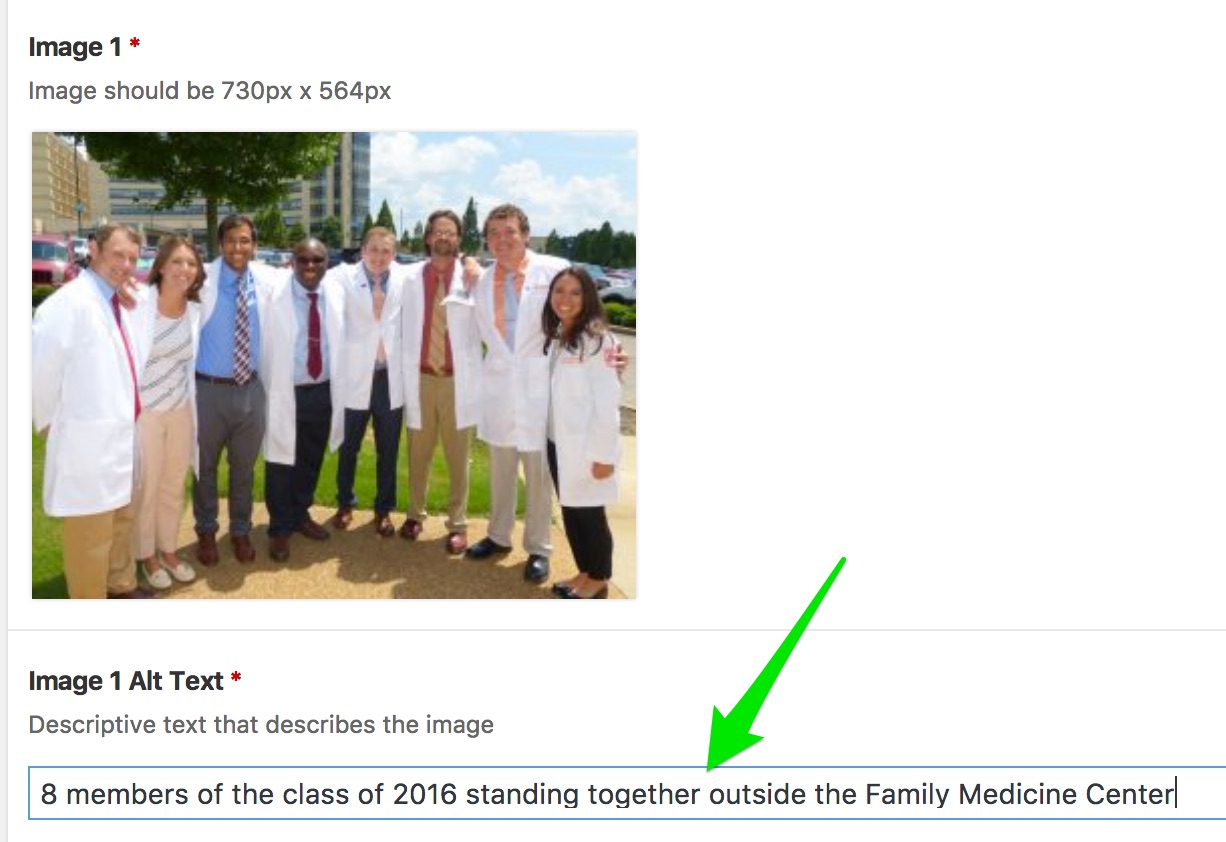
- Drag an image that is cropped to 730px x 564px into the window that pops up.
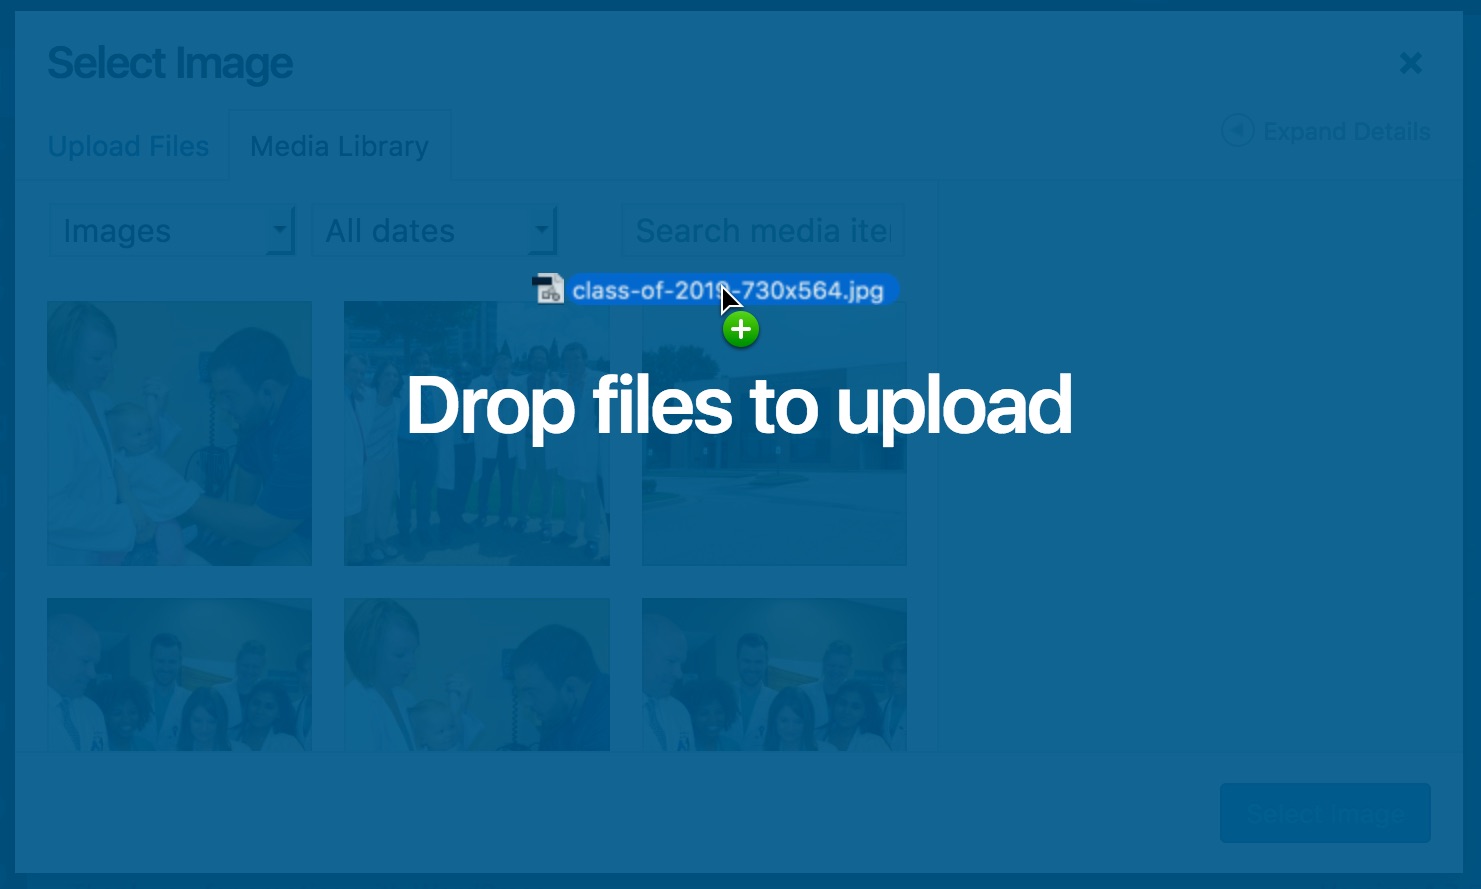
- The image you uploaded will be loaded and ready to be selected in the Attachment Details pane. Click the Select Image button that appears.
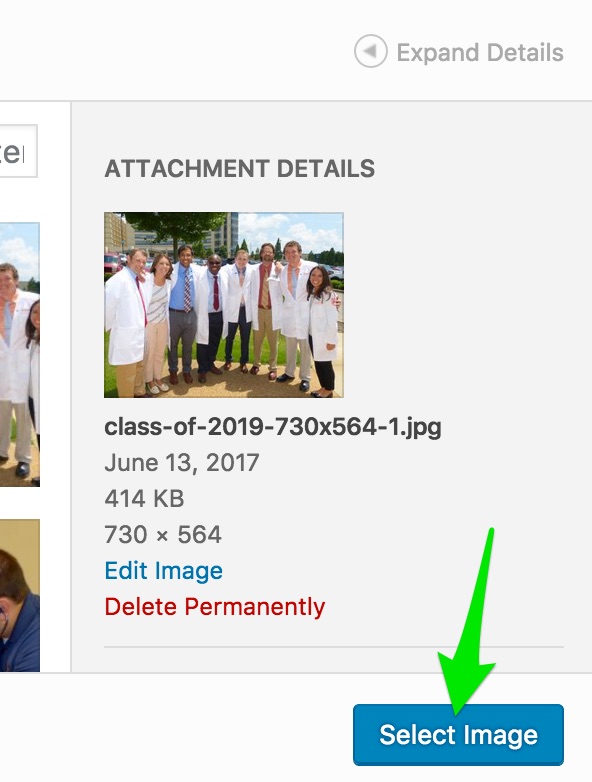
- Add text to the images alt text input field.
- Click the Update button.
Activate a Reminder
- Go to Reminders.
- Click the Edit this Post button under the reminder you would like to activate.
- Click the checkbox under Display on Homepage.

- Click the Update button.
Create a Reminder
- Go to Dashboard > Reminders (in the left menu).
- Click the Add New button at the top of the page.
- Fill out the next 4 text entry fields
- Add a headline to Enter title here.
- If you want this new reminder to appear you will have to click the checkbox under Display on Homepage. You can also create it now but save it for later by leaving it unchecked.
- Add message to the Reminder Text field.
- Add text that describes the featured image to the Descriptive text for the featured image field.
- Add a link to the featured image's website that you have permission to use to the Attribution link for the featured image field.
- Click Set featured image in the Featured Image widget.
- Drag and drop a 200 x 200 pixel image into the browser window.
- The new image that was loaded will be selected for you.
Click the Set featured image button. - Click the Publish button.
Edit a Reminder
- Go to Reminders.
- Click the Edit this Post button under the reminder you would like to edit.
- Text and links can be edited in the Reminders widget.
- The image can be edited using the Featured Image widget.
Schedule an Appointment Button
To update this section please send an email with any changes to Web Services.
×Walk-ins and Appointments Feature
To update this section please send an email with any changes to Web Services.
×Faculty Callout Section Content
- Go to Pages in the left menu.
- Click Home - Front Page
- Scroll down past the Homepage Slider widget to the main content editor.

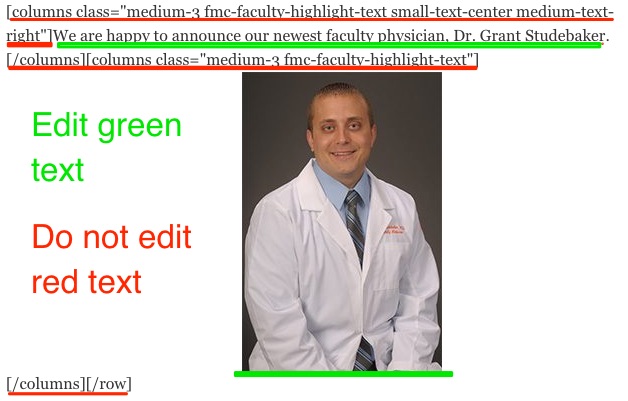
- Do not edit text where it is surrounded with brackets [ ]. This is used to control the layout of the content.
- Edit any text or images that are not in brackets [ ]
- Click the Update button.
Note:
For instructions on how to replace the picture see Replace Image on Page
For instructions on how to replace the picture see Replace Image on Page
Specialties Section Content
- Go to Pages in the left menu.
- Click Home - Front Page
- Scroll down past the Homepage Slider widget to the main content editor.
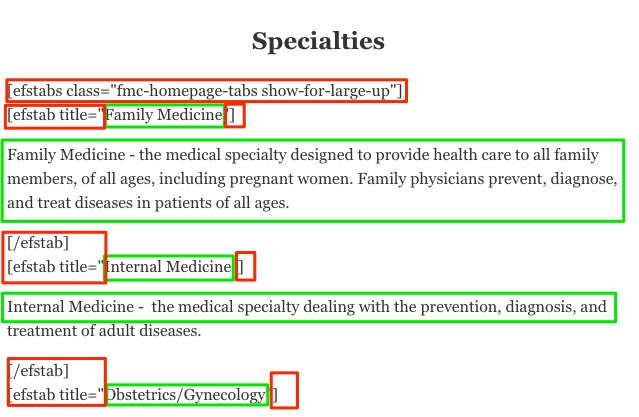
- Other than the values for efstab title, do not edit text where it is surrounded with brackets [ ]. This is used to control the layout of the content.
- Edit any text or images that are not in brackets [ ]
- Click the Update button.
Footer (Copyright, Address, Hours, Button, Map)
To update this section please send an email with any changes to Web Services.
×Edit The Main Heading on Page
- Go ot the page you want to edit.
- Toolbar > Edit Page

- Edit the text in the first field.
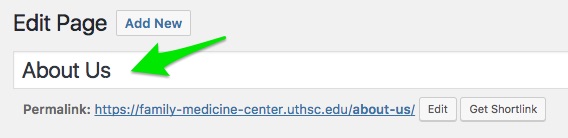
- Click the Update button.
Edit Text on Page
- Go ot the page you want to edit.
- Toolbar > Edit Page
- Edit the text in the main content editor.
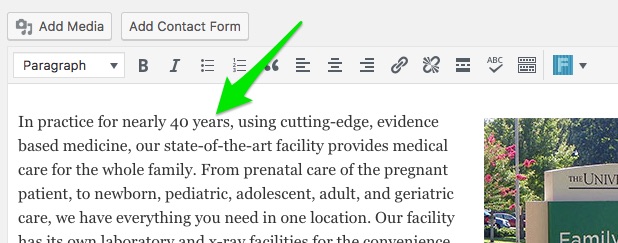
- Click the Update button.
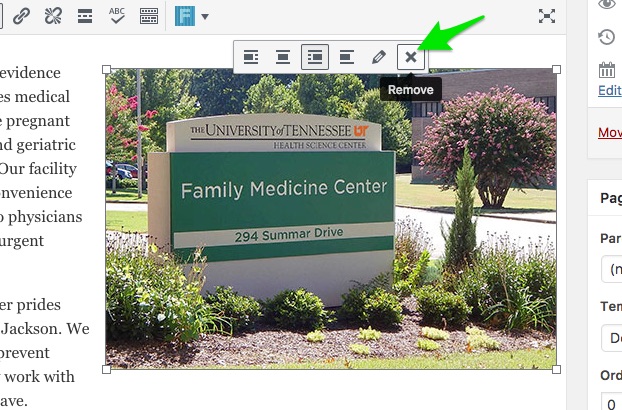
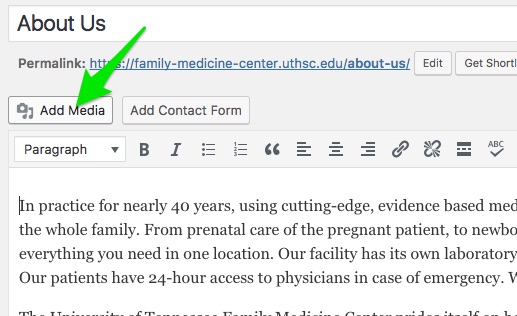
Replace Image on Page
- Toolbar > Edit Page
- In the main content editor click the image you want to remove and then click the X in the popup menu.
- Select where you want the image to begin by clicking in the text editor.
- Click the Add Media button above the main content editor
- Click the Media Library tab at the top of the Insert Media window.
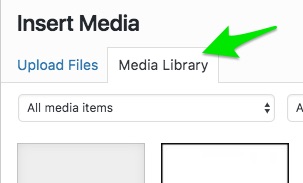
- Click the image you would like to add.
- Add text to the field next to Alt Text that describes the image.
- Click the Insert into page button.
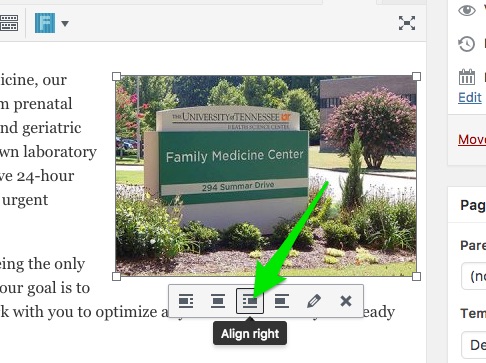
- Click the image to reveal pop up menu and select an alignment
- Click the Update button.
Delete Image from Page
- Go ot the page you want to edit.
- Toolbar > Edit Page
- In the main content editor click the image you want to remove and then click the X in the pup up menu.
- Click the Update button.
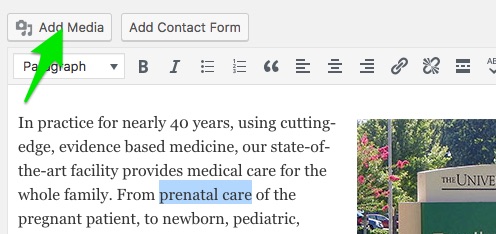
Add Image to Page
- Go ot the page you want to edit.
- Toolbar > Edit Page
- Click to insert the cursor where you want to place the image.
- Click the Add Media button above the main content editor
- Click the Media Library tab at the top of the Insert Media window.
- Click the image you would like to add.
- Add text to the field next to Alt Text that describes the image.
- Click the Insert into page button.
- Click the image to reveal pop up menu and select an alignment
- Click the Update button.
Add Caption to Image
- Go ot the page you want to edit.
- Toolbar > Edit Page
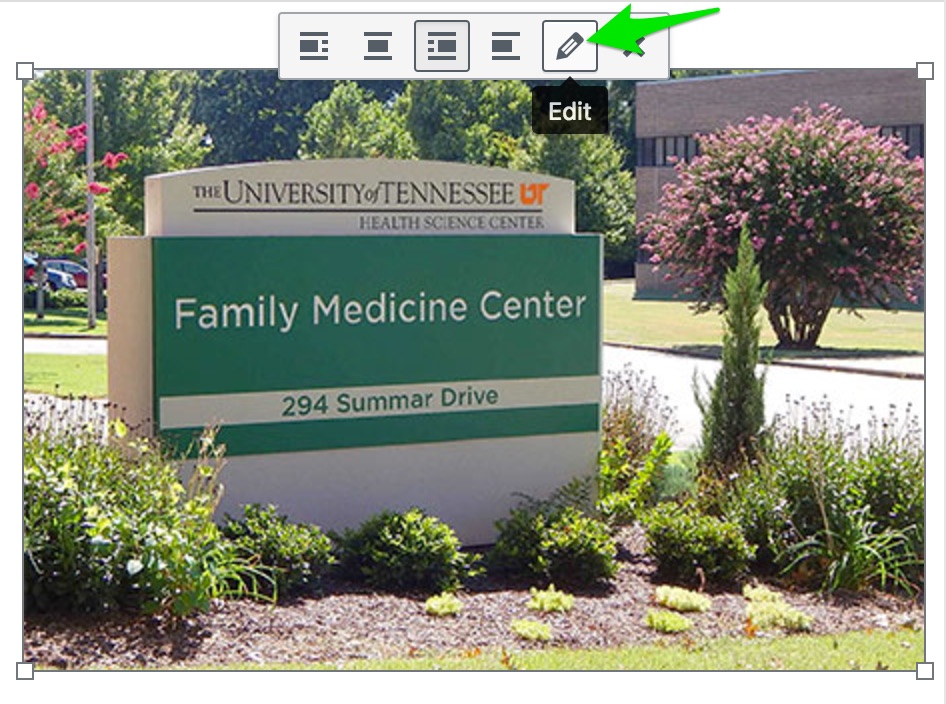
- Click the image to reveal the image editing menu and click the edit icon.
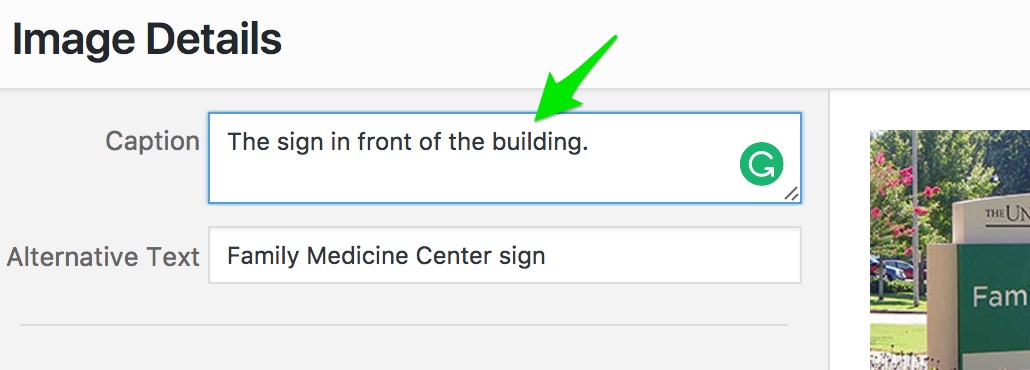
- Add text to the Caption input text field
- Click the Update button.
- And again - click the Update button.
Add Links in Text
- Go ot the page you want to edit.
- Toolbar > Edit Page
- In the main content editor:
- Highlight the text.
- Click the Link icon in the content editor menu.
- Place URL in the text field of the pop up.
- Click the Return button.
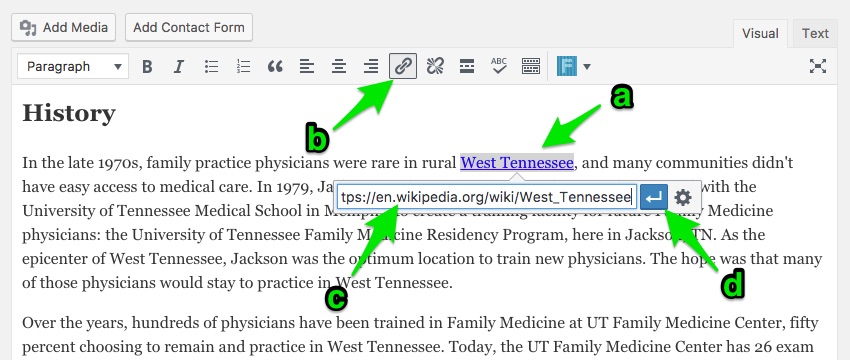
- Click the Update button.
Remove Links in Text
- Go ot the page you want to edit.
- Toolbar > Edit Page
- In the main content editor:
- Click anywhere in the linked text in the content editor menu.
- Click the Remove Link button in the pop up menu.
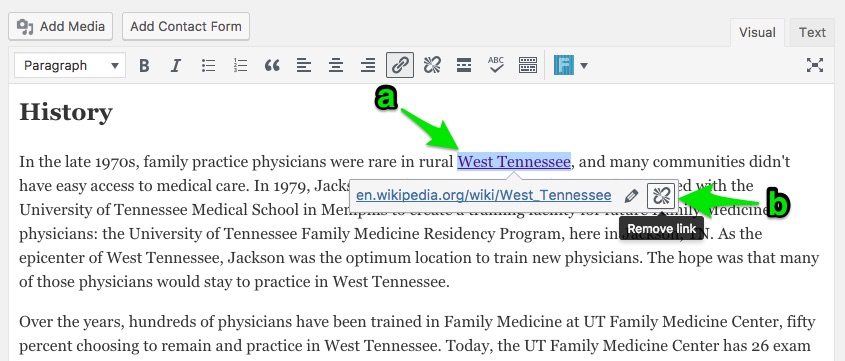
- Click the Update button.
Update "Contact Us" Sidebar
To update this section please send an email with any changes to Web Services.
×Update "Links" Sidebar
To update this section please send an email with any changes to Web Services.
×Add a Document and Link It
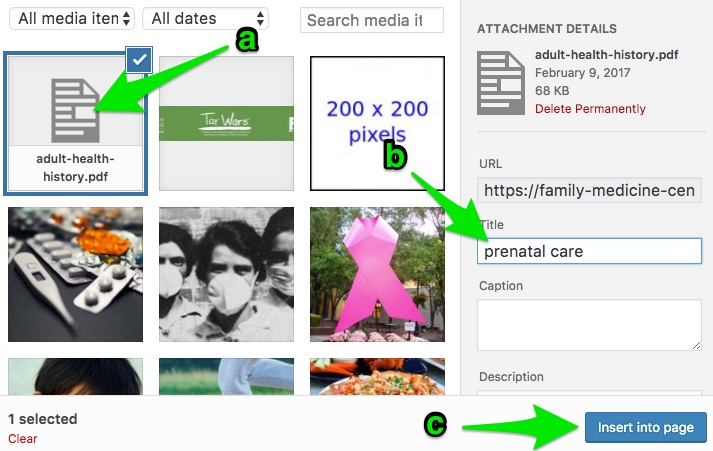
- Dashboard > Media > Add New
- Drag the document into the Drop files here box.
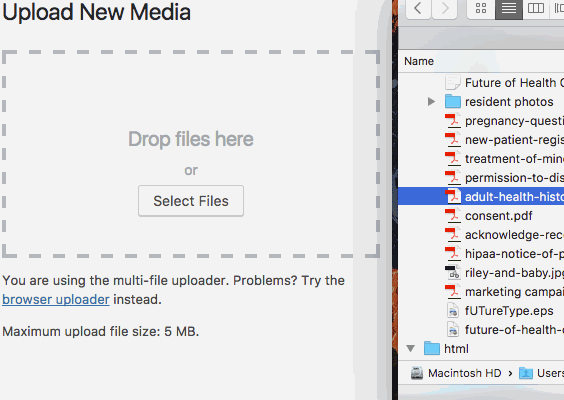
- Go to the page where you want to add the document > Toolbar > Edit Page
- Highlight text.
- Copy text.
- Click the Add Media button.
- Select the document.
The first listed media item will be the latest upload. - Under Attachment Details - paste text into the Title field.
- Click the Insert into page button.
- Select the document.
Delete a Document or an Image
- Dashboard > Media
- Select the document or image.
- In the pop up window click Delete Permanently.
Before deleting be sure to Remove Links in Text that are associated with this upload.
- Click OK in the dialog box to complete the process.
Create a New Page
- Dashboard > Pages > Add New
- Add text to the Enter title here field.
- Add content to the main content editor.
- Click the Publish button.
Publish a Draft or Pending Review to Live
- Dashboard > Pages
- Click the page title in the list.
- Click the Publish button.
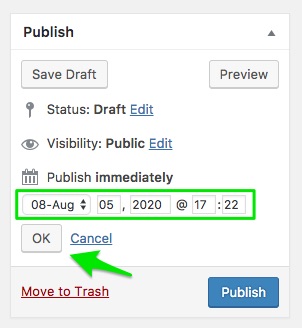
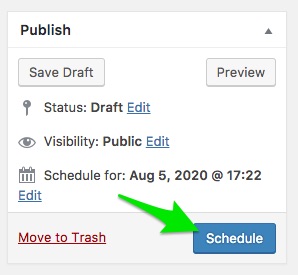
Schedule a Page to Publish at a Future Date
- Dashboard > Pages
- Click the page title in the list.
- In the Publish widget click Edit next to Published immediately.
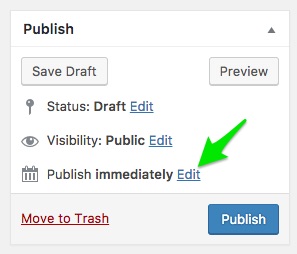
- Enter a future date and time in the section that appears.
- Click the OK button.
- Click the Schedule button.
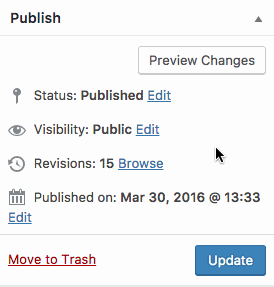
Unpublish a Live Page to Draft or Pending Review
- Dashboard > Pages
- Click the page title in the list.
- In the Publish widget click Edit next to Status: Published.
- A selection field will appear. Click to to reveal options and choose Pending Review or Draft.
- Click the OK button.
- Click the Publish button.
- Click the Update button.

- Header (Logo & Slogan)
- Schedule an Appointment Button
- Walk-ins and Appointments Feature
- Faculty Callout Section Content
- Specialties
- Footer (Copyright, Address, Hours, Button, Map)
- Edit Top Headline on Page
- Edit Text on Page
- Replace Image on Page
- Delete Image from Page
- Add Image to Page
- Add Caption to Image
- Add Links in Text
- Remove Links in Text
- Update "Contact Us" Sidebar
- Update "Links" Sidebar
- Add a Document and Link It
- Delete a Document or an Image
- Create a New Page
- Publish a Draft or Pending Review to Live
- Schedule a Page to Publish at a Future Date
- Unpublish a Live Page to Draft or Pending Review
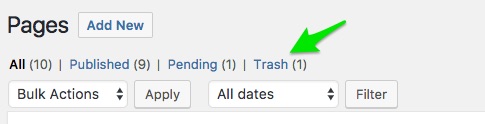
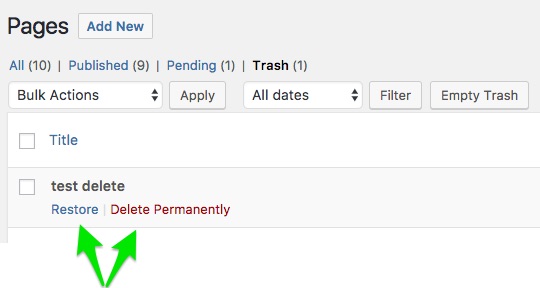
- Delete a Page
- Restore a Page or Delete Permanently
